[Updated 2007.02.20: Added links to Related Posts at the end of this one.]
Here’s a series of photos showing how the front garden has evolved so far, from when we closed on our house in Spring of 2005, to this past fall. This is one of the four gardens – one for each side of the house – I’ve written about previously. This will be the heirloom garden. The house was built in 1900. I’ll be relying as much as possible on plants which were available in 1905 or earlier.
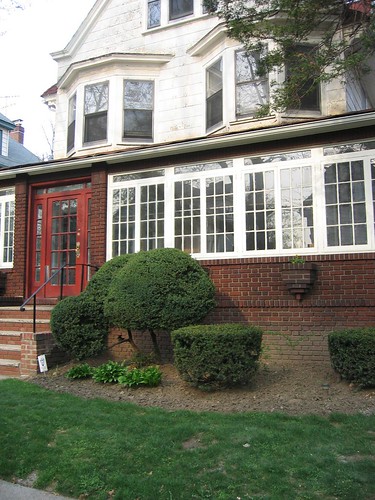
 This is what the front yard looked like when we closed on the house. Half the depth is devoted to a small lawn. The planting bed held a boxwood, two yews, a few hostas, and nothing else. There was not even a single daffodil bulb.
There was also a full-grown white cedar at the corner of the front porch. You can see its foliage at the upper-right of this photo. The cedar was beautiful, and huge – taller than the house – but it was in the wrong place. The trunk was pressing against the porch roof, so it had to go. It was obviously planted as a foundation plant decades ago, without regard for how tall it would get.
 Here’s a detail of the brickwork to the left of the front steps, in front of the mud room. Note the built-in planter on the porch wall. Another is visible in the photo above, and there’s a third hidden behind the boxwood. One of my initial goals was to open up the plantings along the front of the house to expose and highlight the brickwork.
 Here’s the garden a month later. The boxwood and yews have been removed, as well as the cedar. You can now see the other planter, and the beautiful brickwork along the front of the house. The repetition in the windows and the horizontal lines of the brick details are more typical of Arts&Crafts than Victorian architecture. This is one of the reasons why I believe the front porch was enclosed early in the life of the house, and worth preserving.
On the right, the mulch on the ground is part of what’s left of the cedar. I also kept four logs from the lowest section of the trunk. I’m using these now as seating in the backyard, which gives you some idea of the trunk this tree had. I hope to eventually incorporate the wood into something else for the garden.
 And another month later, in June of 2005. There’s some more plants which I moved from Garden #3. I put up the rainbow of silks to mark Gay Pride month.
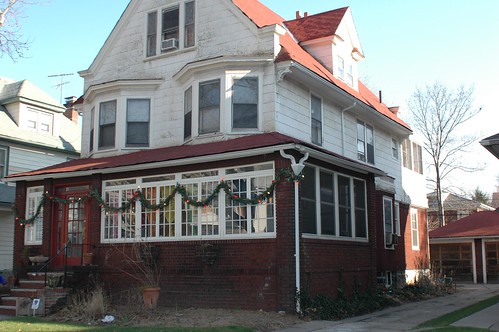
 Winter of 2006. I had started playing around with some containers in the front yard. You can also see the south side of the house, which doesn’t have too much going on yet. And of course the old-school big-bulb Christmas lights and garland.
 May of 2006. More planters, especially on and around the steps. You can see the last of the heirloom Tulips to the right of the steps. The silks have faded a lot from the previous year.
I started putting in some stepping stones to edge the lawn and planting area, both as a shortcut path across the lawn, and to guide my push mower.
 September of 2006. Lots of containers now. I’ve finished the path across the front lawn, and put in some hose guides. The red and yellow flowers in the large terra-cotta pot to the right of the front steps is Canna “Cleopatra”. The Hosta are blooming. The tall pink and purple flowers are Cleome, Spider Flower, I grew from seed given to me by a gardener from Long Island.
I’m still working my way across the front yard. One reason I haven’t finished more is that we have to replace the roof this year. A complete tear-down, which means lots of debris on all sides of the house. Which means lots of smushed plants. Hopefully we can get the roof replaced early enough in the year that I can still get a good growing season in, and finish the front garden.
Related Posts:
- January 29, 2007: The Front Garden This Morning
- August 19, 2006: Heirloom Plant Profile: Canna “Cleopatra”
- June 9, 2006: The Fourth Gardens
- April 30, 2006: Four Gardens Revisited

Hi Xris,
You’ve written an irresistible post! It was so much fun to see the gradual changes – first the rather barren beginnings, then the colorful silk flags finding echoes in the planting of colorful live plants.
I think you’re wise to hold off adding new stuff until the roof is replaced. We found that trailing a large magnet over the area when the job was done was wise, too – you want to get the roofing nails out of beds and turf before a foot or mower run into them.
Annie at the Transplantable Rose
It was nice to see the progression. I went through quite a bit of external home improvement for a few months a few years back (repointing the brickwork and scraping and painting the wood siding) and I found that the most damaging thing was not debris, but the workmen. The just don’t seem to see the difference between flowers and grass.
Good luck with protecting your flowers. I found that stratigically placed tomato cages & drop clothes helped keep down debris damage.
How cool! I look forward to continuing to follow along with this renovation… I would love in principle to recreate my entire garden with plants that would have been available when the house was built, but I know that I lack the willpower to resist some of the newer cultivars.